![[Select]](../images/ro6doc.gif)
|
Application Suite: Maestro |
|
|
MaestroMaestro enables you to transcribe music in standard musical notation and play it through the computer's own sound system. It also provides some simple editing facilities. The following description assumes that you are familiar with musical notation.
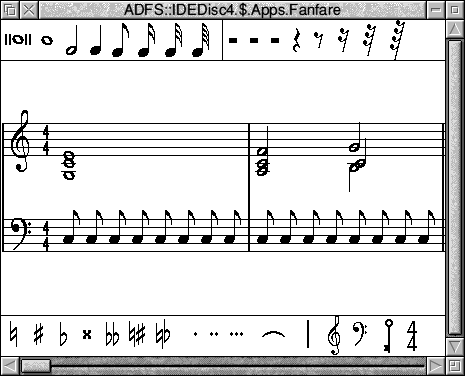
The best way to get started with Maestro is to load one of the tunes supplied. To do this, double-click on one of the tune icons in the Tunes directory, or drag it onto the Maestro icon on the icon bar. The window that appears looks like this:
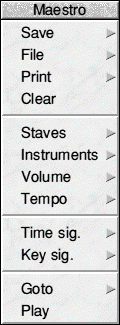
The Maestro window is divided into three horizontal panels, with the stave in the centre. Above and below the stave are toolboxes containing icons for notes, rests, clefs and other symbols. To play a tune, click MENU to open the main Maestro menu. Click SELECT on Play to start the music. As the music plays, the score scrolls across the screen, this scrolling only affects the central panel. Click Play again to stop the tune, another bar or so will play before the music stops. To return to the beginning of the score, use the horizontal scroll bar. Before setting up your own score, try out the following editing procedures on one of the tunes supplied on the disc. Editing the score Adding and deleting notes and rests Notes may be placed anywhere; above and below each stave they will create their own ledger-lines. In the case of notes with stems, the stem trails behind the trial icon. If the pointer is moved downwards, the stem will be above the note, if upwards, the stem will be below the note Rests will appear only in their valid positions, in the centre of the stave. To delete a note or rest, select the icon for the same value and position the trial icon exactly over the item you wish to remove (it doesn't matter whether the stem goes the same way or not). When it is in the right place, the trial icon will appear to blot out the original item. Click SELECT and the item will be deleted. Adding dots, accidentals, bars and ties Select and place accidentals, bars and ties in the same way: like notes and rests, they will appear only in valid positions. A bar will be inserted across all the staves in the score when you click on one of them. The tie character is of a fixed length, but when placed between notes of the same pitch, a single note will sound, with a duration equal to the two notes added together. Adding clefs and key and time signatures Key and time signatures must be selected before they are positioned on the score. This is done using the Maestro menu, and the process is described in the appropriate section below The Maestro menu As in any application, clicking MENU on the Maestro window will display the top-level menu.
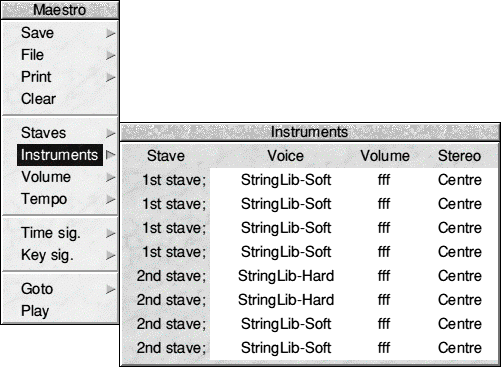
If you have installed a MIDI expansion card in your computer, the Instruments box will have an extra column headed MIDI. The line for each instrument contains a figure I by default, indicating that it will play on MIDI channel number 1. Click on this number to change the channel number for each instrument. In addition, when a MIDI card is installed a MIDI only entry is added to the set of voices that appears when you click on the voice entry; choose this entry to prevent any sound being played through the computer's own speaker.
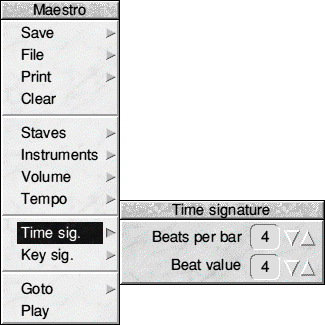
To assign a time signature to a score (or to add a new time signature in the middle of a score):
The selected time signature will appear on all staves. To delete a time signature select the 4/4 icon. move the pointer onto the time signature and click SELECT.
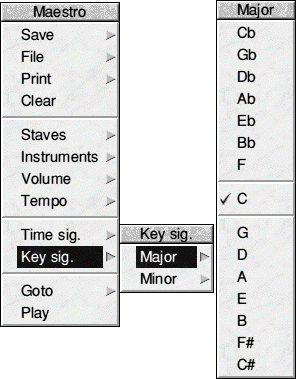
The Key signature menu tree first asks you to choose between major and minor keys. Taking the major path offers you a set of key signatures with C at the centre, 'flat' key signatures grouped above and 'sharp' signatures below. For minor keys, A is at the centre. To place a key signature at the beginning of a score, or at the beginning of a bar:
The selected key signature will appear on all staves. To delete a key signature, select the key icon, move the pointer onto the key signature and click SELECT.
Setting up your own score The preceding description of the Maestro menu options gives you the information you need to set up your own score. However, for the sake of clarity, the following section sets out the steps to take in their most convenient order (though they can be changed at any time). The menu options are shown in bold type.
You are now ready to start placing notes on the staves to construct and play your own music.
|
|
This documentation is copyright 3QD Developments Ltd 2013 and may not be reproduced or published in any form without the copyright holder's permission. RISC OS is subject to continuous development and improvement as such all information is provided by 3QD Developments Ltd in good faith and is believed to be correct at the time of publication E&OE. 3QD Developments Ltd cannot accept any liability for any loss or damage arising from the use of any information provided as part of the RISC OS Documentation. HTML document version r23142 (3rd November 2015) |