| Beginner's Guide to WIMP Programming |
|
| Martyn Fox |
14: Saving, Loading and Error Boxes
We will leave the full RISC OS-type methods of loading and saving until later, and concentrate on simple things for now.
We'll need some more items on the window menu, so first expand the DATA statement in PROCwindow_menu:
 2660 DEFPROCwindow_menu
 2670 RESTORE +1
 2680 DATA Test,Options,Clear_D,Load,Save,*
 2690 wmenu%=FNmake_menu
 2700 ENDPROC
 2710 :
We are adding options to load and save and also one to clear the window in one go, with a dividing line between it and the next two items.
Three more lines in PROCmenuclick will handle these selections and direct us to the appropriate procedures:
 1980 DEFPROCmenuclick
 1990 REM handles mouse clicks on menu in response to Wimp_Poll reason code 9
 2000 LOCAL c%,adj%
 2010 c%=FNstack(20)
 2020 SYS "Wimp_GetPointerInfo",,c%
 2030 adj%=(c%!8 AND 1)
 2040 SYS "Wimp_DecodeMenu",,topmenu%,b%,c%
 2050 CASE $c% OF
 2060   WHEN "Quit":quit%=TRUE
 2070   WHEN "Clear":PROCclear
 2080   WHEN "Load":PROCload
 2090   WHEN "Save":PROCsave
 2100 ENDCASE
 2110 IF adj% PROCshowmenu(topmenu%,topx%,topy%)
 2120 PROCunstack(c%)
 2130 ENDPROC
 2140 :
Clearing the window is very simple; we just have to put -1 at the start of the Plot Instruction List, at list%, and redraw the entire window area by using PROCforce_redraw:
 3390 DEFPROCclear
 3400 !list%=-1
 3410 PROCforce_redraw(main%)
 3420 ENDPROC
 3430 :
Simple Saving and Loading
Now type in PROCload and PROCsave:
 3440 DEFPROCload
 3450 OSCLI ("LOAD Shapefile "+STR$~list%)
 3460 PROCforce_redraw(main%)
 3470 ENDPROC
 3480 :
 3490 DEFPROCsave
 3500 n%=FNend+4
 3510 OSCLI ("SAVE Shapefile "+STR$~list%+" "+STR$~n%)
 3520 *SETTYPE Shapefile &012
 3530 ENDPROC
 3540 :
The listing at its current stage is in the Steps directory as page_131.
For the moment we will limit ourselves to saving and loading a file called 'Shapefile', in the Currently Selected Directory (CSD).
The Currently Selected Directory can be changed with the command:
*Dir
followed by the pathname of the directory. (If you're in the desktop, press F12 to get the '*' prompt.) If you are using RISC OS 4 or RISC OS 5, you can set the CSD very easily with the Filer: just open a menu over the window you want to become the CSD and then choose Set work directory or Set directory from the menu (the wording varies between versions of the OS).
Saving our instructions is simply a matter of saving the Plot Instruction List. Loading just involves loading the file into the buffer and redrawing the window.
To save the list, we first have to find the start and end of the block of memory. You will recall that we wrote PROCend to find the end for us, and the start is, of course, at list%.
We would normally use a star command to save a block of memory. The syntax of the command is as follows:
*SAVE <filename> <start address> <end address>
The end address in the command is, in fact, the address of the first byte following the end of the block we wish to save. To keep the filing system happy, line 3500 sets n% to this address.
Using the OSCLI Command
Because star commands are not handled by Basic, we cannot put Basic variables into them. Instead, we use the OSCLI command to produce a string containing the star command. We make up the start and end addresses using the STR$~ command, which generates a string containing the value of the variable. The '~' means that it's in hexadecimal form, as required by the command.Loading the file is even simpler. We just have to load it into the Plot Instruction List buffer, starting at list%, then redraw the window.
We would normally load a file to a specific address with the command:
*LOAD <filename> <start address>
Line 3450 in PROCload constructs this command for us, using the STR$~ command, as in PROCsave, and line 3460 redraws the window.
Load the application onto the icon bar, then open a directory window showing your currently selected directory. This will probably be the root directory of your default drive, unless you've changed it.
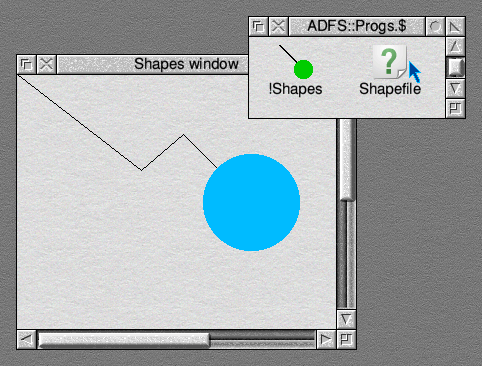
Now open your application's window and draw a few lines or other shapes, then click Menu on the window and choose Save. The disc should access, and you should see an extra file icon appear. It will be a plain white icon, with the filename 'Shapefile'. You have saved your work of art!
To prove it, open the menu again and choose Clear to empty the window, then choose Load. Your beautiful picture should reappear.
Setting the Filetype
We ought to give our file a filetype, so that it is distinguishable from any old data. Filetypes consist of a three-digit hexadecimal number. Various numbers in the possible range of &000 to &FFF have been set aside for specific purposes in the operating system, and many more individual numbers have been assigned to producers of commercially available software. However, the block of 256 numbers from &000 to &0FF is allocated for anybody to use, so we should use a number in that range. The number &012 seems as good as any, so we will use that. Line 3520 takes care of the necessary command.Even though our file has a filetype, it's still represented by a plain-looking 'unknown file' icon. The filing system still doesn't know what filetype &012 is, or how to represent it.
Other applications have their own filetypes, and their files are represented by special icons, so how do they do it?
A New Sprite
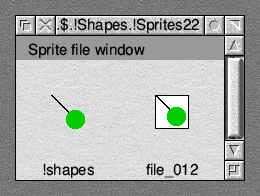
Do you remember when we started to design our dialogue box? We looked at the sprite files in the Wimp directory in Resources and saw the sprites that represent various filetypes, such as Obey files. The Obey file sprite was called 'file_feb', and Obey files have filetype &FEB. Other filetypes have sprites with similar names.Clearly, we need a sprite called 'file_012', so load your !Sprites file into Paint and create one. Like the application icon itself, it doesn't need to be anything fancy, and in fact for simplicity it could just be a copy of the application sprite, but placed over a square white background and perhaps with a square black border around it to distinguish the file icon from the application. As a general rule, application icons should have an irregular shape (using masked pixels around the outlines) whereas file icons should be roughly square, but the two should clearly be related, so the file icon may perhaps have a copy of the associated application icon inside it. Anyway, just create a new icon called 'file_012' which is easy to identify.
For the !Sprites file, 'file_012' should be 34 by 17 pixels, like the application icon. If you made a small version of your application sprite, you could also make a small file icon, which should be 17 by 9 pixels and called 'small_012'. If you have created !Sprites22 and possibly !Sprites23 files, they should have equivalent sprites inside them as well, using the same names, but with dimensions 34×34 pixels for 'file_012' and 17×17 pixels for 'small_012'.
Once you have run !Shapes again, which causes the *IconSprites command in the !Run file to be obeyed, you will find that your Shapefile is represented by your new icon.
If you select the Filer menu option, Display>Full info, you'll see that most filetypes are, in fact, referred to by name, but our file continues to be referred to as '&012'. Surely we should be able to get our filetype referred to as 'Shapes', or something similar.
The secret lies in the system variables. If you type:
*Show
you will see all the system variables listed, among them a number of the form:
File$Type_FEB : Obey
Try typing:
*Set File$Type_012 Shapes
You will now find that the filetype for your file is given as 'Shapes' (though you may have to close and reopen the Filer window containing the file to see the change take place). You can make this happen automatically by including the command in your !Run file, but it will only take effect when you load the application.
If you wanted to have your filetypes correctly labelled without first loading the application, you could create an Obey file called !Boot in the application directory, containing the command to do it. This file would be run by the Filer automatically, whenever you opened the directory containing your application for the first time.
All this may seem a bit pointless at this stage, but we will make use of filetypes and the !Boot file when we cover auto-loading towards the end of the guide. It's also worth knowing about filetypes and how to represent them, in case you write an application that uses files.
How to Survive an Error
Now to a further experiment. Run the !Shapes application and set the Currently Selected Directory to your floppy drive. Draw a few lines in the application window, then remove the floppy disc from the drive and select Save on the window's menu. Alternatively, if you don't have a floppy disc to hand, set up a RAM disc, set the CSD to its root directory, and then remove the RAM disc before choosing Save.You will, of course, get an error message when you do this, and unfortunately, that is also the end of your program. It has closed down because of your error handler at the beginning of the program and any data you were trying to save has been lost - all because of a trivial error (OK, you did it deliberately, but it could easily happen by accident)! We need a more advanced error handler; one which can cope with errors of this sort without closing down the application.
Commercial software makes use of the Wimp's error box, so our error handler should be able to as well. Our new error handler will be a function that looks like this:
 3590 DEFFNerror
 3600 !b%=ERR
 3610 CASE !b% OF
 3620   WHEN 1<<30:err_str$="":box%=3
 3630   OTHERWISE:err_str$=" at line "+STR$ERL:box%=2
 3640 ENDCASE
 3650 $(b%+4)=REPORT$+err_str$+CHR$0
 3660 SYS "Wimp_ReportError",b%,box%,"Shapes" TO ,response%
 3670 =(response%=2)
 3680 :
Line 3660 calls Wimp_ReportError, which generates the error box. Within the box, we can have an 'OK' icon or a 'Cancel' icon, or both, depending on the number in R1, which comes from variable box%.
R0 contains the address of a standard RISC OS error block, which we construct starting at b%. A standard block contains the error number in the first word, followed by a string containing the error message, which ends with a zero.
R2 contains the application name, for putting in the title bar of the error box, so that it can read 'Error from Shapes'. This could be useful if there are several applications running, to show which one caused the error.
After the call, R1 contains a number which we put into variable response%. This will be 1 if we clicked on 'OK' and 2 if we clicked on 'Cancel'. We use this number to make the function return TRUE if we clicked on 'Cancel' and FALSE if we clicked on 'OK'. By this means, we can choose whether or not to close down the application.
There are two kinds of error - fatal and non-fatal. Fatal ones are errors which the program cannot survive, and mean it has to close down. These mainly consist of programming errors, and should be sorted out by the time the program has been debugged. Non-fatal errors are the kind that should not require the application to quit completely. You wouldn't expect your word processor to shut down and lose all your text because you had tried to save it without a disc in the drive!
By the way, in using the term 'fatal error' in this context, we do not mean quite the same thing as RISC OS. A fatal error in Basic is one with error number zero, such as 'Stopped' or 'No room'. These errors cannot be intercepted by an ON ERROR ... line and always force the program to close down.
The ways in which our error handler deals with these two types of error differ in two ways:
- Non-fatal errors are given an 'OK' icon as well as a 'Cancel' icon in the error box, giving you a choice of whether or not to quit the application. Fatal errors only have a 'Cancel' icon.
- Because fatal errors are usually the result of programming errors, the error message is followed by 'at line' and the line number, to assist in debugging.
Making Errors Non-Fatal
So how do we distinguish between a fatal and non-fatal error? The answer is that we create non-fatal errors ourselves, with Basic's ERROR statement, and give them our own special error number. FNerror uses this number to decide whether or not to treat the error as fatal.RISC OS error numbers are allocated rather like filetypes, in that all the lower numbers are in use, but numbers with bit 30 set (beginning with &40000000) are available for use within programs.
We will use error number &40000000, which we can also write as 1<<30, for our non-fatal errors. The CASE ... OF... ENDCASE structure in lines 3610 to 3640 detects this and sets up the value of box% accordingly. If bit zero of box% is set, the error box has an 'OK' icon; if bit 1 is set, it has a 'Cancel' icon.
The purposes of most of the remaining bits are of no interest to us at this stage - they are listed in the Programmer's Reference Manual if you want to see them. You may like to know, however, that, if bit 4 is set, the words 'Error from' do not appear in front of the application name on the title bar. You could use this call to provide a 'Message from...' box in one of your applications.
Because we use the CASE ... OF structure, you can add lines to make it handle other errors that you want to treat in a special way. The OTHERWISE... statement in line 3630 deals with all other numbers, and treats them as fatal errors, but you could add lines to handle other custom error numbers if you wish, such as (1<<30)+1. It's up to you to experiment!
Intercepting Errors
Now that we've written our new error handler, how do we arrange for it to be called? We can leave the existing one-line handler in place in line 60; it will do to handle errors that occur during initialisation. We will add a new line:10 REM >!RunImage 20 REM (C) Martyn Fox 30 REM shape drawing program 40 REM based on Wimp shell program v0.01 50 version$="0.01 (date)" 60 ON ERROR PROCclose:REPORT:PRINT" at line ";ERL:END 70 SYS "Wimp_Initialise",200,&4B534154,"Shapes" TO ,task% 80 PROCinit 90 PROCcreateicon 100 ON ERROR IF FNerror THEN PROCclose:END 110 REPEAT 120 PROCpoll 130 UNTIL quit% 140 PROCclose 150 END 160 :
As you can see, if FNerror returns TRUE, meaning that we have clicked on the 'Cancel' icon, we close down immediately.
After you've added this line to the main part of the program, notice where it's located - just before the main Wimp polling loop.
If an error occurs, the program stops whatever it's doing and jumps to here. If we are closing down, this is of no consequence, of course. If you click 'OK', though, the program continues on to Wimp_Poll, ready for further instructions.
You can generate an internal error quite easily if your programming detects that something is not right, with a line such as:
IF x%=2 THEN ERROR 1<<30,"You wally, you can't do that!"How, though, do we prevent external errors, such as a failure to save a file, from closing down our application? The answer is that we intercept them.
Replace two of the lines in PROCsave with four new ones:
 3510 DEFPROCsave
 3520 n%=FNend+4
 3530 SYS "XOS_CLI","SAVE Shapefile "+STR$~list%+" "+STR$~n% TO err%;flags%
 3540 IF (flags% AND 1)<>0 !err%=1<<30:SYS "OS_GenerateError",err%
 3550 SYS "XOS_CLI","SETTYPE Shapefile &012" TO err%;flags%
 3560 IF (flags% AND 1)<>0 !err%=1<<30:SYS "OS_GenerateError",err%
 3570 ENDPROC
 3580 :
The Basic 'OSCLI' statement in the old version called a software interrupt called 'OS_CLI'. A software interrupt, or SWI, you may remember, is the machine code instruction that Basic calls with the SYS command.
X-form SWIs and the V-flag
All SWIs have both a number and a name. If you place an 'X' in front of the name, as in the new lines 3530 and 3550, it adds &20000 to the SWI number. The effect of this is that, if an error such as an empty disc drive is encountered while the SWI is being processed, the routine does not call the machine's error handler, but returns control to your program in the normal way.We do, of course, need to know whether or not an error has occurred, and we do this by looking at the ARM processor's flags.
Don't worry, we're not getting into machine code - the SYS command deals with all this for us.
The processor has a number of one-bit flags which are either set or cleared as it processes its data. One of these is the overflow flag, which, for some reason, is always referred to as V. This flag is normally used in arithmetic operations, but it's also used on returning from a SWI which has an 'X' in front of the name to indicate whether or not there has been an error.
If there was an error, the V flag is set to 1 and R0 contains the address of the error block.
As well as passing the contents of the processor's registers back to us, the SYS command also allows us to see the state of the flags. If you follow the TO keyword with a semicolon, then a variable name, the variable will contain the state of the flags.
Thus in line 3530, the address of the error block (if there was an error) is put into variable err%, and the flags are put into variable flags%. The various bits of flags% hold the states of the processor flags, bit zero being the state of the V flag.
It is a pretty safe bet that an error encountered during the OSCLI 'Save' call can be treated as non-fatal, so we can use SYS "XOS_CLI" in line 3530, instead of SYS "OS_CLI".
Line 3540 checks to see if the V flag is set, and, if so, calls the machine's error handler, by means of system call OS_GenerateError, passing on the address of the error block in R0. Before it does so, though, it modifies the error block. The error number in the first four bytes is replaced by our special number for signalling non-fatal errors. The error message is left untouched, so that it will appear in the error box.
The machine's error handler will pass control over to Basic. Because we set up the ON ERROR... statement in line 100, the program will jump to there, ready for a call to our own error handler, then Wimp_Poll.
As it's just possible for an error to occur during the *SETTYPE command, we will treat it in the same way, in the new lines 3550 and 3560. We also need to modify the loading command in the same way:
 3450 DEFPROCload
 3460 SYS "XOS_CLI","LOAD Shapefile "+STR$~list% TO err%;flags%
 3470 IF (flags% AND 1)<>0 !err%=1<<30:SYS "OS_GenerateError",err%
 3480 PROCforce_redraw(main%)
 3490 ENDPROC
 3500 :
You can find all these changes in the Steps directory as page_140.
Our simple shape-drawing program, which began as a simple training program, is turning into a fully-fledged Wimp application, with the ability to save and reload files.
'It's nothing like the Wimp!', you're probably saying, 'What about loading and saving by dragging icons?' Well, it's strange you should say that, because it just so happens...